Best Stream Overlay Packs for OBS & Streamlabs (2025 Guide)
If you’re ready to upgrade your stream visuals, stream overlay packs are the fastest way to get a cohesive look across Starting Soon, Just Chatting, gameplay, and Be Right Back scenes—without wasting nights tinkering with layers and filters. This guide goes deep. You’ll learn exactly what a professional overlay pack should include, how to install everything in OBS/Streamlabs in minutes, how to avoid FPS drops, how to pick the right style for your brand, and how to troubleshoot the most common problems. By the end, you’ll know how to choose, use, and customize stream overlay packs like a pro.
What Exactly Is in a Stream Overlay Pack?
A good pack is more than a pretty PNG. It’s a complete visual system that turns your stream into a consistent brand. Most stream overlay packs include:
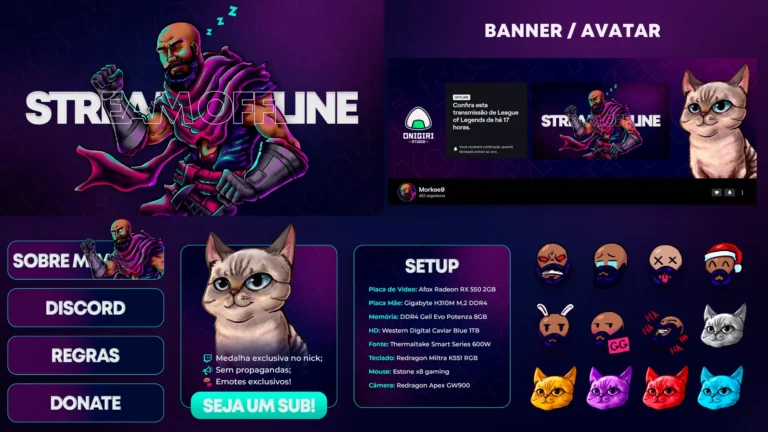
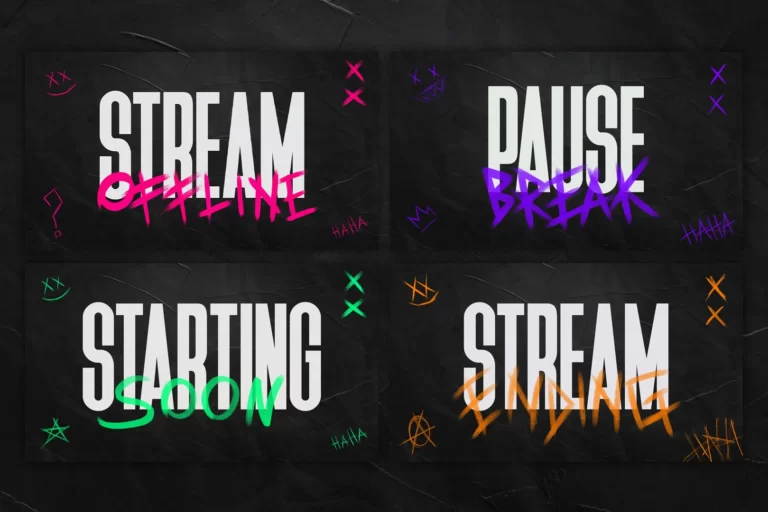
- Animated scenes: Starting Soon, Be Right Back, Stream Ending, sometimes Intermission or Countdown.
- Overlay frames: webcam borders (16:9, 4:3, square), chat frames, labels.
- Alerts & panels: alert graphics (for your alert service), Twitch/YouTube panels for profile sections.
- Transitions: a stinger transition (usually 60fps) for clean scene switches.
- File formats that actually work: WebM with alpha for animations (true transparency), PNG for still graphics, and optional editable sources (PSD/AE or color controls).
- Documentation/scene collections: ready-to-import scene collections or profiles for OBS/Streamlabs that save setup time.
- Branding assets: accent shapes, backgrounds, color variants, and typography guidelines.
A great pack is consistent: the stinger mirrors the same shapes/colors as your Starting Soon scene; webcam borders and panels match the set; alerts don’t feel like a different product glued on later. That coherence is what your viewers feel—even if they can’t name it.
Why Stream Overlay Packs Matter (Beyond Looks)
- Clarity: good overlays create visual hierarchy—gameplay remains the hero, chat is readable, facecam is framed without blocking UI.
- Retention: smooth stingers and polished scenes reduce friction in your show flow, which subtly improves perceived quality and keeps viewers longer.
- Speed: you install once and stream immediately. No rabbit hole of “just one more tweak.”
- Brand: a unified look across Twitch, YouTube, Kick, thumbnails, and socials makes you recognizable at a glance.
- Scalability: once you adopt a style (Neon, Minimal, VTuber/Kawaii, Glitch/Cyberpunk), you can roll out new scenes and assets without redesigning everything.
How to Choose Stream Overlay Packs (Decision Framework)
1) Performance First: File Formats and FPS
- Prefer WebM with alpha for animated overlays and stingers. It keeps file sizes sane and renders true transparency without green-screen hacks.
- Stinger length: keep it short (≈ 0.4–0.9s) so switching scenes feels snappy. A transition point (when the new scene cuts in) around 300–600ms works in most cases.
- Looping scenes: 30fps looks fine for subtle loops; 60fps is ideal for stingers and fast motion accents.
- Audio: keep stinger audio gentle (–14 to –12 LUFS short burst). Avoid loud pops that fight with your mic mix.
2) Compatibility and Setup Speed
- Confirm the pack explicitly supports OBS Studio and Streamlabs.
- Check if the pack includes a scene collection or profile. Importing one can cut setup time from 30 minutes to 3 minutes.
- Vertical streaming? Make sure the pack includes 9:16 variants or separate overlays for TikTok/Shorts live.
3) Design That Serves the Content
- Readability: text overlays and labels must be legible at 1080p on small mobile screens.
- Contrast: avoid neon-on-neon if it kills readability; use a dark plate or subtle blur behind text.
- Motion discipline: animations should guide the eye, not compete with gameplay. Choose styles with controlled motion intensity.
4) Brand Fit and Longevity
- Style: Minimal (clean, professional), Neon/Synthwave (bold, techy), VTuber/Kawaii (soft, playful), Glitch/Cyberpunk (energetic, edgy).
- Color system: packs that ship with color controls or multiple palettes last longer because you can adapt them for seasons/events.
- File access: editable files (PSD/AE) or tintable assets make the pack flexible without re-buying.
5) What’s Actually Included
Look for stream overlay packs that bundle:
- Animated Starting/BRB/Ending scenes
- Webcam frames (multiple ratios)
- Stinger transition (60fps)
- Alerts (visual set; connect to your alert service)
- Panels for your profile
- Optional chat box, intermission layout, lower thirds
- Clear license for streaming/monetized VODs
The “Top Styles” You’ll See (and When to Use Each)
Neon / Synthwave
Bold lines, flowing shapes, saturated color. Great for tech, esports, retro gaming, fast-paced content.
Pros: striking, memorable, lots of energy.
Cons: can overpower content if everything moves at once—keep loops subtle.
Minimal / Dark Mode
Calm motion, high readability, thin typography. Ideal for talk shows, productivity, just chatting, educational streams.
Pros: timeless, light on resources, professional.
Cons: if too minimal, it can feel generic—use accent color wisely.
VTuber / Kawaii
Rounded shapes, soft palettes, playful motion. Perfect for art, cozy games, community-driven streams.
Pros: friendly, brandable, great for emote-driven chat.
Cons: can look out of place for hardcore FPS; match it to your content vibe.
Glitch / Cyberpunk / HUD
Aggressive motion, scanlines, data panels, chromatic aberration. Suits shooters, speedruns, high-intensity content.
Pros: high-impact identity, memorable transitions.
Cons: needs strict motion discipline to avoid visual fatigue.
Performance Guide for Stream Overlay Packs (No-FPS-Drops Checklist)
Your goal is to keep the content fluid and your CPU/GPU headroom healthy. Use this practical checklist:
- Hardware decoding: enable it for Media Sources so WebM animations use GPU acceleration when available.
- Limit animated sources per scene: 2–3 well-placed loops beat 10 tiny gizmos.
- Avoid heavy browser sources: convert looping backgrounds to WebM and keep browser-based widgets lean.
- Cache wisely: let OBS cache media but don’t overload with dozens of large animations running off-screen.
- Canvas resolution: stream at 1080p unless your setup can comfortably handle 1440p. Downscaling helps quality but costs resources.
- Frame rate: 60fps looks great for action; 30fps loops for calm scenes can save resources.
- Color banding fixes: add a little film grain/dither on large gradients; it hides banding in compressed streams.
- Stinger hygiene: short, precise, and properly timed to hide the cut rather than distract from it.
- Test scenes offline: record locally to measure performance without going live.
Installation: OBS Studio (Step by Step)
- Unzip the pack and keep the folder structure intact (e.g.,
/Overlays/Animated/, /Static/, /Stinger/).
- Import scene collection (if provided): Scene Collection → Import and select the file.
- Add an animated element manually:
- Sources → + → Media Source → Browse to .webm
- Enable Loop and Hardware Decoding
- If it’s a background, place it below content layers; if it’s a frame, anchor it above gameplay.
- Set the stinger:
- Settings → Transitions → Stinger → Browse to .webm
- Start with 450ms transition point; adjust until the cut feels seamless.
- Fonts: install included fonts before opening scenes so text renders correctly.
- Profile backup: Profile → Export to save your current settings; keep a backup in cloud storage.
Installation: Streamlabs (Step by Step)
- Unzip and keep structure intact.
- Add Media Source for animations; enable Loop and Hardware Decoding.
- Set Stinger in the Transitions panel; start at ~450ms and tweak.
- Scene Collections: if a JSON or package is included, import it to pre-build your scenes.
- Test: swap scenes, watch CPU/GPU utilization, and tidy layers.
Scene Architecture That Scales (Reusable Building Blocks)
The trick to a maintainable setup is reusing elements across scenes:
- Global Overlay Scene: put your webcam frame, labels, and persistent decorations in a separate scene. Then add that scene as a Source in all your main scenes. Change it once, it updates everywhere.
- Collections by Game Type: racers/FPS might need different crop zones or map coverage. Duplicate scenes, not assets.
- Modular Sources: keep Background, Facecam, Chat, Alerts, Lower Thirds as separate groups you can toggle.
- Profiles for Bitrate/Platform: one profile for Twitch, one for YouTube, one for vertical. Same stream overlay packs, different output params.
Designing for Readability and Accessibility
- Safe zones: leave the gameplay HUD readable. When in doubt, move overlays to the corners or use semi-transparent plates behind text.
- Type pairing: one display font for headings, one neutral sans-serif for labels. Avoid five fonts fighting each other.
- Color contrast: aim for WCAG-ish contrast on text. Dark plate at 50–70% opacity behind labels works wonders.
- Motion comfort: use subtle parallax or glow pulses; avoid high-frequency flicker that tires the eyes.
- Chat legibility: slightly increase line-height and add a soft shadow to white text over busy backgrounds.
Vertical Streaming (9:16) Without Double Work
If you’re also doing TikTok/Shorts live:
- Canvas: create a 1080×1920 canvas profile.
- Reframe: reuse the same stream overlay packs elements; reposition webcam/chat for vertical.
- Crops: game capture > crop to central action; keep labels large (mobile screens!)
- Save bandwidth: 30fps vertical is often enough for talk/interview content; 60fps if you’re gaming on vertical.
Picking the Right Stream Overlay Packs for Your Content
Talk Shows / Just Chatting
- Minimal/Dark overlay, subtle animated accents, large facecam, clean lower thirds.
- Essential: legible labels, a lower-third template, a calm stinger.
Esports / FPS / Racing
- Glitch/HUD/Neon style, high-contrast labels, dynamic stinger.
- Essential: keep gameplay HUD visible, avoid motion that competes with critical UI.
VTuber / Art / Cozy
- Kawaii/Pastel with rounded shapes, chat frame, and poppy alerts.
- Essential: strong Just Chatting layout, emote-friendly spacing, warm palette.
Tutorials / Productivity
- Minimal with emphasis on screen clarity.
- Essential: light loops, simple stinger, readable panels for callouts.
The “Starter / Creator / Pro” Feature Ladder
Starter
- Animated Starting/BRB/Ending scenes
- One webcam frame
- One stinger (60fps)
- PNG overlays + 1 colorway
Creator
- Everything in Starter plus: chat frame, intermission layout, multiple webcam ratios, 2–3 colorways, basic alerts and panels, scene collection.
Pro
- Everything in Creator plus: advanced HUD elements, multiple stingers, alert variations, editable sources (PSD/AE), vertical assets (9:16), brand guide PDF.
As you grow, the cost difference from Starter to Pro often pays for itself in hours saved.
Common Mistakes (and How to Fix Them)
- “My animation shows a black box instead of transparency.”
You’re probably using MP4 or a WebM without alpha. Replace with WebM (with alpha) or a MOV with alpha (heavier). In OBS/Streamlabs, ensure Media Source is used, not a Browser for local animations.
- “My stinger feels laggy or the cut is mistimed.”
Open the stinger settings and adjust the transition point. If your 900ms stinger feels sluggish, try 450–600ms.
- “Dropping frames when I switch scenes.”
Your stinger might be too heavy, or too many high-res loops are running. Shorten stinger, reduce resolution of background loops, ensure hardware decoding is on.
- “Fonts look wrong.”
Install the fonts included with your stream overlay packs before opening scenes. In OBS, refresh the text sources after installing.
- “Alerts don’t match the pack.”
If your pack includes alert graphics, connect them in your alert provider, or at least set colors/animation duration to match. Cohesion matters.
- “Color banding in gradients.”
Add a subtle noise layer behind the gradient, or enable slight dithering; it hides banding in compressed video.
- “Chat is unreadable.”
Increase line-height, add a 2–3px shadow or soft plate, and raise contrast. Consider a slightly larger font size for mobile viewers.
- “Browser sources use too much CPU.”
Convert frequent loops to WebM and keep browser widgets minimal (only interactive elements).
Customization Tips (Fast Wins Without Editing in After Effects)
- Hue/Saturation filters: in OBS, a Hue Shift or Color Correction can recolor many accents instantly; keep within your brand palette.
- Blend modes with PNG: if your PNG assets have white glows, tint them by stacking a color layer under/over with low opacity.
- Replace backgrounds: drop in a subtle animated backdrop (WebM) and keep overlays static to save performance.
- Consistent margins: align webcam, chat, and labels to an 8px or 10px grid; it subconsciously feels “designed.”
- Lower-third template: one reusable lower third for names/segments gives your show a TV-like polish.
Folder Structure and Backups (Don’t Skip This)
- /Overlays/Animated – all WebM loops & stingers
- /Overlays/Static – PNG frames, plates, accents
- /Alerts – alert graphics or exported packs for your alert service
- /Panels – profile panels
- /Fonts – all required fonts
- /Docs – license/readme/quick start
- /SceneCollections – JSONs for OBS/Streamlabs
Back up your scene collections and profiles after you finalize the layout. Keep one cloud copy per platform (Twitch, YouTube, Kick) and one for vertical.
Stream Overlay Packs: Buying Checklist (Print This)
- Includes Starting/BRB/Ending animated scenes
- Includes stinger (60fps) and at least one webcam frame
- Provides WebM with alpha (not just MP4) and PNGs
- Explicit OBS/Streamlabs support (ideally scene collection)
- Readable labels and strong contrast
- Multiple colorways or easy color controls
- License covers streaming/monetized VODs
- Optional vertical assets (9:16) if you plan to stream vertically
- Documentation and quick-start guide
If a product page checks these boxes, you’re looking at a serious pack.
Advanced: Audio & Transitions That Feel Premium
- Stinger audio: a short whoosh or tonal hit works; keep it under 1 second and at a level that doesn’t overpower your mic.
- Timing: your transition point should land on the visual beat—often when the wipe or shape covers the screen.
- Consistency: don’t switch between wildly different stinger styles mid-stream. Pick one per brand and stick to it.
- Scene-specific transitions: if your software allows, use the same stinger everywhere to avoid jarring differences.
Advanced: Color and Typography That Sell Your Brand
- Three-color rule: primary brand color, secondary accent, neutral (white/gray/black).
- Typography: one display font (headings) + one neutral sans-serif (labels). Avoid novelty fonts for body text.
- Spacing: use consistent padding around webcam and chat frames (e.g., 24–32px) so nothing hugs the edge.
- Hierarchy: the eye should know where to look first (facecam or game), second (chat), third (labels). Use size and contrast to guide that order.
OBS Filters and Order (Practical Defaults)
- Facecam: Color Correct → LUT (if used) → Sharpen (low) → Noise Suppression (if needed, but keep audio chain separate).
- Background loop: no filters or slight color correction; keep it light.
- Text: slight drop shadow or outline (use sparingly).
- Global: avoid piling four filters on every source; push corrections into backgrounds or plates when possible.
Troubleshooting: Quick Reference
- Stutters only when the stinger plays → shorten stinger, reduce resolution/bitrate of the stinger file, verify hardware decoding.
- Alpha issues (black box) → confirm WebM with alpha; re-export with proper alpha; use Media Source.
- High CPU in chat scenes → limit browser widgets; use fewer animated elements; lower loop resolution to 720p if it’s only a background blur.
- Desynced audio on stinger → remove audio from stinger (go silent) or align timing precisely; prioritize clean visual cut.
- Fonts mismatch → install fonts first; re-open scene collection; verify text sources.
Frequently Asked Questions (FAQ)
What’s the difference between static and animated stream overlay packs?
Static packs provide PNGs and icons; animated packs add WebM loops and a stinger for scene transitions. Animated packs feel more premium and modern—use them as your base and mix in static elements to save performance where needed.
Do I need a stinger transition?
Not required, but a short 60fps stinger makes scene changes feel intentional and professional. Keep it under a second so it doesn’t slow the show.
Will these packs work on a mid-range PC?
Yes—if you choose WebM with alpha and avoid overloading scenes with many animated sources. Keep heavy loops to 1080p, enable hardware decoding, and monitor your CPU/GPU headroom.
Can I customize colors without After Effects?
Often, yes. Use OBS Color Correction/Hue Shift for small tweaks, or pick packs that include multiple colorways and editable PSDs.
Which resolution and FPS should I stream at?
1080p60 is the sweet spot for most gamers. If your setup struggles, 1080p30 or 900p60 is acceptable. For calm scenes (chat, tutorials), animated loops at 30fps are fine.
Are stream overlay packs allowed for monetized streams?
Quality packs include a license that covers live streams and VODs. Read the license and keep it with your documentation.
I also stream vertical—do I need a separate pack?
Prefer packs that include 9:16 assets or offer a vertical add-on. You can reuse many elements, but layouts must be rethought for mobile screens.
Final Thoughts (And a Simple Plan)
Stream overlay packs are a shortcut to a polished, consistent brand. Pick a style that matches your content, make sure you get WebM with alpha, a 60fps stinger, readable labels, and a scene collection or quick-start guide. Install everything in minutes, keep motion disciplined, and protect performance by limiting animated sources per scene. As you grow, expand from a Starter set to Creator and Pro features—alerts, panels, vertical variants, and editable sources—so your branding scales with your ambitions.
Your 10-minute action plan:
- Choose your style (Neon, Minimal, VTuber, Glitch).
- Verify the buying checklist (WebM with alpha, stinger 60fps, OBS/Streamlabs support).
- Install, set the stinger at ~450ms, and test scene switches.
- Tweak colors/contrast for readability; simplify busy scenes.
- Back up your profile/scene collection; go live with confidence.
When you choose and use stream overlay packs with intention, your stream looks cohesive, your workflow gets faster, and your brand becomes unmistakable—on every platform you touch.